How To Create A Floating Sticky Side Bar On Blogger

Elements that float along your screen are pretty cool and attention grabbing. They are more commonly known as the “Sticky” floating widgets that stick to your screen as you scroll and tend to have a higher click through rate. This is the reason why at MyBloggerLab, we are using a Floating subscription widget in the sidebar that has been quite useful for us. Many of our users kept on emailing us about how they can create a “Sticky” floating sidebar widget in Blogger. In the past, we have already shown you how to make a Sticky Floating Footer bar in Blogger. In this article, we will show you how to create a floating “sticky” Sidebar widget in Blogger?

Remember: This works pretty well with all kinds of widgets present in your sidebar. It is not necessary that a person can only use if for email subscription boxes. You can use it for promotion of your items, galleries, popular posts, Instagram photos, and basically everything that you wish for. 
5 Major Differences Between A Blog And Website
Differences between a blog and a website are highly searched in today's online arena. Blogging/blog terms are so intensely used around the net, that many newbies get stuck on the point here. So i thought why not to mention the basic differences between the two ways by which we can publish our content online.
 
To summarize, blog is a type of a website (Web log= Blog). Website is a general term. (site on web=website). You might have heard about those static sites and dynamic sites.
 
blog vs. website major differences and comparison
 
That idea supports the Blog vs Website theory. There are few technical differences, as to how the data is presented to the readers. We would also discuss couple of reasons due to which blogs are highly considered now days, to present data online.
 
As the saying goes:
‘All apples are fruits but not all fruits are apples.’
Similarly,
‘All blogs are websites but not all websites are blogs.’
However, what some of you might not be aware of is the major difference between the two and how these two make a difference to the global world with their presence. Let me put some light to the major differences between a blog and a website.

And yea, if you are wondering about the eBook series, its not finished yet. In fact we are onto the interesting part. So stay tuned for it in the coming days. Its always better to change some taste. Isn't it?

Blog vs Website - Characteristics Match up

According to Wikipedia, a blog is as follows:
Wikipedia 
A blog (a blend of the term web log) is a type of website or part of a website supposed to be updated with new content from time to time

Examples of blogs are famous news magazines such as buzzfeed, techCrunch, Lifehacker or news sites such as The New York Times, CNN, BCCetc. that publish stories on daily basis. Or even sites ran by individuals on a specific niche such as this blog!
While a website:
A website is a collection of related web pages, including multimedia content, typically identified with a common domain name, and published on at least one web server.
Examples of websites is everything that exists on ! Because a website is the mother term given to all sites that you browse online including the blogs. Whether it may be social media networks like Facebook/Twitter or Ecommerce sites such as eBay, amazon, Alibaba or community forums such as stackoverflow, Google forums or Quora.
 
Blogs are generally more informally presented to the visitors. The language used is often much simpler than on websites. (though its not necessary as many webmasters now have started to use simpler language, to make their view point clear to a wider range of people, around the globe.)

In blogs, there is a feature called "posts", as what you are reading now. Every post have its own page (as the url suggests), but the main page (homepage) of the blog is dedicated to the
series of latest posts in reverse-chronological (latest to oldest) order.

recent postsBloggers often prefer to show around 8-12 recent posts on their blogs main (home) page. Where as there is nothing such in a static website. Even if a website is about tutorials (like Lisa Arby's popular website, 2createawebsite.com). The website was launched years ago, when the blogging wasn't quite into the online world.

She did a pretty neat job with the sequence of the content. Interlinking was perfect. You could take a look to that site, in order to get to know the feel of a static website.

The major difference between the two types, blog and a static website is about the content refreshment. The major content of website remains the same. Though the webmaster could add additional pages to the website to increase the content, but the order by which the information is presented could not be later changed. (isn't changed).

That's where blog have started to gain popularity. Have you ever thought about the way you search internet now days? You either follow a specific blog right away (through bookmarks) or in most cases, you search search engines.

Search engines help you to get to a specific question (like how to add bla bla to blogger). It would take you to the static page, with the best information of the particular topic, either it comes from blog or website. So the content is basically searched the same way as before (through search engines), but blogs provide a different dimension to the way information is presented.

Another huge aspect of blogs due to which people have adopted them, are their ability to get crawled by search engines frequently. As the posts are updated on daily basis (sometimes many times in a day), so search engines crawl blogs many times a day in order to fetch new content. 

Blog Vs. Website: What's The Difference?

These are five ways you can identify a 'Blog' when compared to any website found online.
  1. A Blog provides a Commenting System
  2. A Blog offers a subscription system to send free email newsletters to readers.
  3. Articles inside a Blog are organized through categories and tags.
  4. Articles in a Blog appear in reverse-chronological order, latest to oldest.
  5. A Blog is managed by an individual author or a team of authors often called the editorial board.

1. A Blog Contains a Comment Form

If you see a comment form at the bottom of a webpage, know that you are reading a blog. Blog comment forms are a great way to interact with the author and share your insights or ask him queries regarding the blog post.
blogs have a comment form
These comment forms could be simple text boxes with fields for Name, Website/Email, Message. Or it can be a third-party comment plugin powered by Disqus, Facebook or Google+.

2. You Can Subscribe To a Blog Updates

Blogs are more like newspapers. Covering a vast variety of topics and publishing several articles each day or each month. Visitors to blogs who want to stay updated with latest blog posts, subscribe to the email newsletter.
blogs have a subscribe form
Blog administrators use difference email delivery systems such as Feedburner, Awber or mailchimp to send email updates to their readers.

3. Blog Articles are Organized By Categories & Tags

Blogs provide great navigation to its visitors thanks to the use of Categories and tags. Categories classify the blog topics into different groups and tags classify them into sub-groups. Users can then read their topics of interest with the help of these category pages.
blogs have categories
If you observe our blog menu at the top, you will find that, we have organized our content into different labels/categories. This helps you to better navigate our site.

4. Blog Content is always Displayed In reverse-chronological  order

A blog will always display its newest blog posts at top and oldest at bottom. This sequence is adopted for both blog posts and comments, so that the readers could reach newly published articles on homepage easily.

5. Unlike a Website, a Blog Can Be Managed by a Single Author!

You don't need a big team to manage a blog. This is one reason why blogs have become the best source of online earning for enthusiastic people who love to share their knowledge with the rest of the world. I started this blog all alone and I am running it for over 8 years without a big team.
blogs can be managed by a single author unlike a website
You can surely increase the number of authors on a blog to publish content more frequently. Large corporate blogs have no more than 10-15 bloggers on its editorial board, who publish content regularly.
You can
create a free blog on Blogger, Tumblr or even Wordpress. Unlike building a website, you don't need to have advanced technical skills such as web development or knowledge of web hosting or FTP to start a blog. Thanks to free blogging platforms like Blogger, you can start your blog without worrying about the coding part! 
How to Optimize and Use PDFs as Online Content?
As you probably know, PDFs are a very popular document format – mostly due to the fact that they can be viewed on any platform while preserving the document layout and formatting. Because of this universal compatibility they are often used for distributing or printing documents.
optimize PDF documents as online content
The one area where PDFs have traditionally not been very popular is as online content on websites. Although most web browsers can view PDF documents, the misconception that search engines could not index PDF files meant that many people avoided them for quite some time.

 
That myth has been completely debunked now, and Google confirmed that they have been indexing and ranking PDF documents since 2001. Still, it is important to understand that PDFs are a very unique type of content and if you do decide to use them online you will need to optimize them in several ways. This is a friendly A-Z guide on PDF SEO and best practices.

Make Sure the File Size is Low

One of the main issues with publishing PDF documents as online content is that their file size can be very large – which is especially true for long documents that have lots of images. That is far from ideal for online content, as it means that it will take longer to be displayed, which in turn could result in readers clicking away rather than waiting for it to load.
Additionally search engines regard page speed as an important metric when ranking webpages, and a large PDF file that loads slowly is likely to suffer on that front too.
Although there are no hard and fast rules, you should try to keep the file size of any PDFs you intend to use as online content as low as you can. That can be done through several means:
  • Avoid creating PDFs that are too long

    Thousand page PDF documents rarely make for good online content, and you’re better off sticking to much lower page counts. Not only will shorter PDFs have a lower file size, but they’ll also retain more readers.
    If you do have a PDF document that is too long, you may want to consider breaking it up into several shorter PDF documents. Alternatively you could extract the important parts and publish them individually.
  • Only use images when necessary

    Don’t go overboard inserting images in PDF documents as each image can contribute significantly to its file size. Initially you should only insert images that are essential to the content, and later add others if the file size permits.
    The quality of the images that you add (for JPG especially) can make a large difference to the file size of your PDF documents.
  • Compress the PDF files

    When you export PDF files you will often find several options that you can use to compress or reduce the file size of your PDFs. It is worth taking advantage of these options, or using other PDF compression tools to reduce their file size.
    If you do compress PDF files (especially using other tools) you should check to make sure their formatting, layout and image quality is still satisfactory after you do.
If you can get your PDF files as low as 15MB or 25MB it should be fairly good. On the other hand if your PDF files start to approach 100MB or more then you’re likely to want to look carefully at them.

Optimize for Search Engines

Just like any form of online content, you will want your PDF documents to be optimized for search engines. Fortunately that is one area that PDFs are actually surprisingly good at, as they have a lot of components that you can treat similarly to normal HTML documents.
When you want to optimize a PDF document for search engines, you should focus on:
  • Descriptive file names

    The file name of your PDF documents should reflect its contents, and ideally contain the main keyword you’re targeting. Generally using the title and separating the words with dashes is the good option.
  • Title and description tag

    In every PDFs document properties there will be a title and description tag. Both tags will be used in the same way as their HTML counterparts and represent the text that appears in search results – and should contain keywords, particularly long-tail ones.
  • Other document properties

    Aside from the title and description there are several other document properties such as the author, keywords, and so on. While these may not have the same impact, it is worth filling them out regardless as they help contextualize your PDF document for search engines.
  • Alternate tags

    It is possible to add alternate text tags to images in your PDF documents, and you should take full advantage of that fact. Just like with webpages, search engines can’t ‘view’ images the same way that people do, so providing them with text that describes the image can help.
If properly optimized, your PDF documents will be able to rank well on search engines. Generally search engines will treat PDF documents in the same way as HTML documents, and so the other factors that influence SEO such as keywords and backlinks will work in much the same way.
In short if you optimize your PDF documents for search engines, you should start to see them get listed and rank just as well as the rest of your online content.

Link To and Link From

As you probably know, PDF documents support hyperlinks – and you should take advantage of that. In particular you can use the hyperlinks to overcome one of the weaknesses of using PDF documents as online content, which is the fact that they tend to be ‘isolated’ from the website they’re published on.
Unlike conventional HTML webpages nowadays that share the same common structure and are part of the Content Management System (CMS) in most cases – PDF documents do not share those elements. When visitors click on a link to a PDF file they are instead ‘downloading’ the PDF document and viewing it in their browser.
While you can’t completely overcome this due to the fact that it is simply how PDF documents work – links can help you to make it less of a disadvantage. In particular you should make it a point to:
  • Link to your PDF documents in your website

    Rather than treating your PDF document as a ‘download’ you should link to it the same way you’d like to any normal webpage. If you want you can add a ‘(PDF)’ excerpt of text to the title, to let readers know that they’re about to open and view a PDF document.
  • Link back to your website from your PDF document

    Within your PDF document, you should try to link back to your website. If you want you could place hyperlinks as part of the content that links back to relevant pages on your website, but more importantly you should link back to your ‘home’.
    One way to do that is to add a hyperlink in the header of every page of your PDF with the text ‘Back to home’ or ‘Back to website’. That way readers will be able to quickly go back to your website, and the PDF will feel a little less isolated from it.
Another reason to establish a network of links to and from your website and PDF documents is because they will appear more as part of its content to search engines as well. That can help your PDF documents to get indexed faster, and give search engines more information regarding their context too.

Conclusion

As you can see there are lots of areas that should be optimized if you want to use PDF documents as online content. Some of the areas are easy, but others can be a bit more difficult to handle.
PDF editor
If you intend to use PDF documents as online content regularly, you may want to try using a simple PDF editor such as Movavi PDF Editor. It is a basic PDF editor that will let you add, remove, and rearrange pages in PDF documents, while also adding and adjusting images and performing other alterations. In short it is a pretty handy tool that will let you tweak your PDF documents and prepare them for online use.

For the most part it is best to regard PDFs as a particular type of online content. It is by no means ideal to replace all your HTML webpages with PDF documents, but adding a few PDF documents as content can be good.
To be entirely honest, using PDF documents as online content works best when it is an article or document that readers may want to download and save later. In that specific situation, the fact that the content is in PDF format will benefit readers as it will make it more convenient for them.

Post credits: mybloggertricks
Show IP Address & Geolocation Of Website Visitors Via JavaScript
Privacy and freedom are two things no one can compromise for anything. From anonymous web browsing using VPN or proxy servers to anonymous electronic transactions via cryptocurrencies, online freedom is the biggest quest of internet users today.
show IP address using javascript
Achieving complete anonymity online is difficult but not impossible thanks to developers working hard to introduce new tools and apps every other day. I am sure you all know how to hide your IP address using a VPN server, Tor browser or any proxy server but what may seem more appealing to you would be understanding how can you find out your website visitor’s IP addresses and geolocation using plain client-side JavaScript and HTTP API.

What is IP address?

IP address stands for Internet Protocol address which is a unique string of numbers separated by full stops that identifies each computer using the Internet Protocol to communicate over a distributed network.
IP address is a unique numerical address assigned to your computer by your Internet Service Provider (ISP). Every computer connected to internet has a unique IP and its internet activity can easily be tacked through its IP address.
At present you can easily retrieve useful client IP addresses using WebRTC that is supported by browsers such as Firefox, Chrome and Opera. But to fetch full details of a user’s IP address there are tons of free services that provide a public HTTP API.
These APIs  uses a database of IP addresses that are associated to cities along with other relevant information like time zone, region, zip code, latitude and longitude.

How To Show Site Visitor IP address and Geolocation?

I am using the free HTTP API provided by freegeoip.net site. We will make a simple ajax call to freegeoip to fetch the JSON data and parse JSON as text in plain JavaScript. The data is requested from the server using XMLHttpRequest().

You can show this IP table anywhere you want, may it be your blog post, a static page or blog sidebar.Liked it? Let’s learn how to add this cool JS tool to your blogger blog or wordpress blog to show visitors data in real time.
  1. Copy the code below and paste it inside the HTML editor of your blog theme or blog editor
     <style> 
            
    #loaderip {margin:10px;padding:20px; background:yellow; font-size:30px; } 
            
    table.custom, table.custom2{width:100%;font-family:helvetica;border-spacing: 0;border: 0px solid #bbb;}table.custom,table.custom th,table.custom td, table.custom2 th, table.custom2 td{border:1px solid #ddd;border-collapse:collapse}table.custom td, table.custom2 td{padding:15px; min-width:100px;}th{padding:7px 10px;text-align:left;font-family:oswald;font-weight:400; font-size:16px;}table.custom tr:nth-child(odd), table.custom2 tr:nth-child(odd){background-color:#f1f1f1}table.custom tr:nth-child(even), table.custom2 tr:nth-child(even){background-color:#fff}table.custom th{background-color:#333;color:#fff;border:1px solid #333}table.custom th:nth-child(even){background-color:#555} 
            
    table.custom2 th{background-color:#7dc733;color:#fff;border:1px solid #6fc415}table.custom2 th:nth-child(even){background-color:rgba(111, 196, 21, 0.75)} 
            
    table.custom2 td:nth-child(odd){font-family: oswald;width: 43%;} 
            
    table.custom2 th:hover {background-color: #6fc415;}</style>
    
    <div id="loaderip">Loading your location details, please wait.........</div> <div id="demo"></div>
    <script> //Show IP address my mybloggertricks.com var hideloader = document.getElementById("loaderip"); var xmlhttp = new XMLHttpRequest(); xmlhttp.onreadystatechange = function() {     if (this.readyState == 4 && this.status == 200) {         var myip = JSON.parse(this.responseText);         document.getElementById("demo").innerHTML = '<table class="custom" border="0" cellspacing="0" cellpadding="0" width="590"><tbody><tr><td colspan="2"><p align="center"><font size="3"><b>Your IP Address is ➔</b> </font><strong><font color="#008000" size="5">'+myip.ip+'</font></strong></p></td></tr><tr><td valign="top" width="295">Your Public IP</td><td valign="top" width="295">'+myip.ip+'</td></tr><tr><td valign="top" width="295">Country Code</td><td valign="top" width="295">'+myip.country_code+'</td></tr> <tr> <td valign="top" width="295">Country</td> <td valign="top" width="295">'+myip.country_name+'</td> </tr> <tr> <td valign="top" width="295">Region</td> <td valign="top" width="295">'+myip.region_name+'</td> </tr> <tr> <td valign="top" width="295"> City </td> <td valign="top" width="295">'+myip.city+'</td> </tr> <tr> <td valign="top" width="295">Region Code</td> <td valign="top" width="295">'+myip.region_code+'</td> </tr> <tr> <td valign="top" width="295">Zip Code</td> <td valign="top" width="295">'+myip.zip_code+'</td> </tr> <tr> <td valign="top" width="295">Time Zone </td> <td valign="top" width="295">'+myip.time_zone+'</td> </tr> <tr> <td valign="top" width="295">Latitude</td> <td valign="top" width="295">'+myip.latitude+'</td> </tr> <tr> <td valign="top" width="295">Longitude</td> <td valign="top" width="295">'+myip.longitude+'</td> </tr>  </tbody></table>';
            hideloader.style.display='none';     } }; xmlhttp.open("GET", "https://freegeoip.net/json/", true); xmlhttp.send();
    </script>
  2. Save your theme and you are all done!
Feel free to use it in your development projects or apps. Do share your queries or feedback in the comment box below.
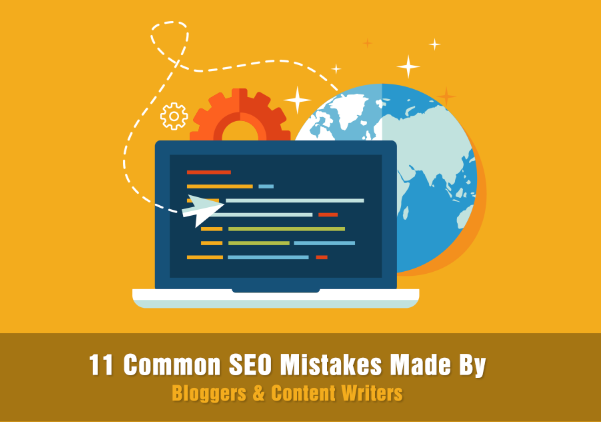
11 Common SEO Mistakes made by Bloggers & Content Writers
Did you ever notice why some webpages rank higher in search results while some not, despite the same efforts? There are three popular reasons why a particular website content ranks higher. Firstly may be that particular website content has received more quality backlinks compared to its competitor, secondly may be it has a better keyword research strategy and thirdly may be it is well optimized with no content writing common SEO mistakes.
Due to all these three reasons, your competitor is ranking higher and is better crawled and indexed by search robots.
In today's tutorial I will guide you on how to avoid these on-page optimization mistakes that is seriously effecting your organic traffic and wasting both your energy, time investment and efforts.
11 Common SEO mistakes made by bloggers and content writers
Every pro blogger has a secret tool that helps him dominate the SERPs, in our case webtexttool(WTT) has so far been a great affordable companion that has not only helped me but also my co-authors to polish our SEO skills and publish quality content that brings consistent flow traffic from Google, Bing and now even Yandex. Google keyword planner is just another free tool that we also use along with WTT.

80% of all content writers which includes both bloggers and freelance writers, often make at least one or all of these SEO mistakes unknowingly. You really need to rely on free on-page SEO tools such as webtexttool that we discussed earlier in order to make sure you find and fix all such SEO mistakes in real time while writing your blog posts.
Following is the list of some 11 common SEO mistakes that most bloggers and content writers make without even noticing them. Unless you rectify and fix these SEO errors and mistakes, there is honestly no easy hope for someone to rank well in search engines.

1. Not doing Keyword Research

Most bloggers have the habit of not doing a keyword research while preparing a blog post. They randomly select a title and then start writing whatever that comes to their mind. Using common sense is a good habit but how can you assume those billions of different keyword combinations that users type in Google without using keyword suggestion tool? May be your visitors are more likely to type "smartphone" and not "cellphone" or may be people in south Asia are more likely to recognize USB as a "Flash Drive" compared to people in USA who refer it as "Flash Disk"
How will you make sure that you use the best combination of keywords with low competition but higher volume reach in order to attract a huge wave of new visitors to your blog or website?
We always do keyword research either using Google keyword tool or using Webtexttool's Keyword suggestion tool. For example before I could begin with this post, I did a research on what title to choose for this post. Shall I go with "SEO errors" or "SEO mistakes"? Shall I choose the phrase "freelance writers" or "content writers" ? For this the best way is to see which keyword has a good reputation and has the potential to bring you more targeted visitors.
Doing a simple research on WTT keyword analysis tool, made it easy for me on which keywords to pick for this post.
keyword analysis and selection in webtexttool
WTT also offers you related keyword suggestions just like Keyword planner but with some additional info and better presentation.
  • The search volume is an indication of the number of queries on your keyword per month.
  • Competition is an indication of how strong competition is on your keyword.
  • The overall score combines the search volume and competition
keyword suggestions
When required always go with keywords that have easy/low competition because these are keywords that give you the extra benefit of fewer competitors and better reach to a potential audience which are yet not targeted by your competitors. WTT also gives an estimate overall reputation score, which helps you to pick a keyword easily.
In our case I chose "Common SEO mistakes" which is sort of a long tail keyword and with very easy competition.
As far the second keyword phrase is concerned, I found "content writers" more preferred over "freelance writers" with wide volume reach, therefore I selected it.
keyword suggestions for content writers
Once you have completed your keyword research analysis, you are ready to choose a SEO friendly title for your post.

2. Title Tag Exceeding The Standard Length

You can now place both your WTT suggested keywords inside your title to draft a keyword rich title for your content. In our case we choose the following:
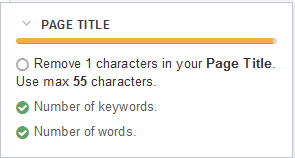
11 Common SEO Mistakes made by Bloggers & Content Writers
Length: 57 characters
Three things are important while writing a search friendly title:
  1. Number of Keywords - Add your keyword one time
  2. Number of Characters - Add at least 7 characters but maximum 60 characters
  3. Number of Words - Add at least 3 words
Make sure your title contains your primary keyword or focus keyword and make sure your title does not exceed the 60 characters optimal Length for search engines.
Google displays the first 50-60 characters of a title tag. If you keep your page titles under 55 characters, you can expect at least 97% of your titles to display properly in search results. A title longer than 60 characters is chopped/cut by Google and is not given preference in SERPS.
To ensure your title is well optimized, click the "Use my keyword" button to open your Webtexttool editor.
keyword suggestions
and then type your title inside the editor and check the realtime results:
common seo mistakes in page title
On your right panel, you can check if your title follows SEO best practices:
SEO mistakes in title tag
You can also use our Character counter tool for this purpose.

3. Meta description missing or too long in length

Next comes writing the search description for your blog content which is often avoided by bloggers because they have a false belief that search robots will pick it automatically from the starting paragraph of the page content. But this is a serious myth and SEO mistake.
Meta description tag is the soul of your entire content. It gives a simple, precise and summary of your entire article. A robot finds it extremely helpful when you provide a short 145 Characters summary of your blog posts. It is the second biggest ranking factor after the title. When you don't manually choose a description for your blog posts, you give your competitors a bigger chance to rank higher than you.
In blogspot blogs you can add content description inside the "Search Description" box. In wordpress, the meta description box is located just under your WP editor. 
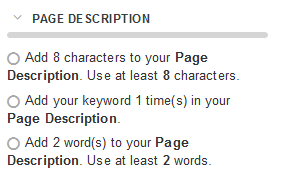
Common SEO mistakes in meta description
Now to test whether your description is search friendly or not, test it with WTT in real time. Webtexttool gives the following suggestions for a SEO friendly page description:
  1. You must add at least 8 characters or 2 words inside page description
  2. Your Character count must not exceed 145 characters
  3. Your description must include your primary keyword.
best SEO practises for meta description
Paste your description inside WTT field and see if it qualifies the test. In our case we used the following description:
List of common SEO mistakes that most bloggers make while writing blog posts. Find and fix all these on-page optimization mistakes.
Length: 132 Characters
common SEO mistakes in meta description
best seo practices for page description
and thus we passed the test!

4. Un-Optimized Permalink

Most people do not realize that permalink is the third most important place after title and description, where they can insert their focus keyword for maximum search exposure.
An optimized permalink is a combination of targeted keywords that explains the content of your post. It should be precise and to the point. Long, lengthy links get chopped in search results and you loose the opportunity of ranking high in SERPs.
  1. Depending on your URL structure keep it limited to 40 Characters
  2. Must insert your Keyword in permalink
  3. Keep it short and to the point
Common SEO mistakes in permalink
I have written a detailed tutorial on how to optimize permalinks and use correct URL structure. Please read this post for in-depth details:

Easily Create a Custom App With FileMaker Without Coding!
FileMaker is a multi-platform relational database application developed by the FileMaker Inc. It is a computer software company - a subsidiary of Apple Inc. This application assimilates the database engine with the graphical user interface and provides high-security structures and has a drag and drop option which allows the user to make alterations to the database.
create custom app without coding with filemaker
This relational database application helps in developing, supporting and marketing an application. FileMaker is quite famous for being user-friendly and its capability of serving the dynamic web pages without the use of any external applications. It comes for both Mac OS and Microsoft Windows operating systems with the main focus on providing the businesses and home-users with the best and high-quality experience.

Its success and popularity lie on the two factors: web companion and amazing business templates which makes it a perfect application for all the beginners. Also, it allows the website administrators to instantly add any database publishing competencies to their already running company intranet or website.
It has several versions released especially for iPhone and iPads such as FileMaker, FileMaker Pro 16, FileMaker Go 16, FileMaker Server 16 and FileMaker Pro Advanced 16.
We have already shared several tutorials on how to code custom mobile apps for a website and I clearly understood how time consuming it is to code an app from scratch when we developed the MBT app for our blog, therefore we will be talking everything about building a custom app but we won’t talk anything about coding because we don’t need coding thanks to Filemaker! :)

How To Create a Custom App with FileMaker?

Creating a custom app with coding is not everyone’s job. It requires lots of efforts and study regarding the programming languages and coding paradigms. Therefore, to ease the burden and get apps ready on the fly, FileMaker came into existence. Creating an app using FileMaker takes less than an hour to bring about the basic picture. The basic steps involved are:

Plan, Create and Deploy

Planning Process

When you start off with building an app, first and foremost, decide on what and how you are going to build it. Figure out all the fields, data and information you need to enter or display and identify all the required items and their types.
importing data in filemaker
Open FileMaker and choose from the given list of databases and finalize a database structure. You can either create your own database using FileMaker or import all the data from the existing database. For instance, if you have the records on spreadsheets or a separate database, drag and drop them on FileMaker to quickly import the data. Once, the database is created or all the data is imported into the FileMaker, open data records and work on the layout. The fields can be added and data types can be changed on the go.

Creation Process

For design purposes, there is no need for the user to be a graphic designer since everything is already built-in and the user just has to drag and drop or choose from the available list of themes from the right panel. All the controls are designed in a way to fit all the screen types and a single click can completely transform the whole app. The attractive design templates, appealing charts and tables, basic reporting and beautiful fonts and designs save up the developer’s time and efforts. All these are customizable and very easily extendable.
creating layout in filemaker
After inserting all the data and dragging and dropping the required items of layout and design, the application is ready to share with others within no time. There are two options for sharing the app: either upload it to the FileMaker server or share it with FileMaker clients. Sharing it on the server makes it readily available to a larger number of people thereby helping them in need and allows users to access it using their web browser. However, authentications are required to access it. After all the planning and creation tasks are completed, the custom app is run using the FileMaker Go.

Deployment Process

Once the app is ready to use, if any changes are made while using the app, they are automatically updated for everyone who is using the app be it on the iPad, iPhone, Desktop PC or a Mac book.
hosting filemaker app
The data can still be imported, relationships can be defined, fields can be added, records can be inserted and many more. The addition and updating process keeps going without affecting the already developed custom app.

Where To Host Filemaker Apps?

Hosting the recently built custom application using FileMaker is another grave task which must be done after a thorough research and analysis. Deploying the app using FileMaker is quite an expensive option which might not be feasible for various users. The given options by FileMaker include:
  1. FileMaker Pro 12 which costs around $299.00.
  2. FileMaker Server 12 costs almost $999.00.
  3. FileMaker Go 12 is available for free trial.
Although there are a variety of benefits offered by FileMaker when it comes to deployment the overall cost gets so high that it becomes unaffordable for an average person to use such applications for hosting purposes.

Affordable Solution To Filemaker hosting

As per our research and suggestions, Hostpresto might be a better option for deploying the customs app developed using FileMaker. They offer professional FileMaker hosting services to host even the biggest databases on their most powerful servers. The packages offered by Hostpresto are affordable and specially designed for all the versions of FileMaker. Hostpresto offers two amazing packages for deployment which are:
  1. Shared FileMaker hosting: This is one of the most famous services by Hostpresto and is suitable for FileMaker 14 or lower and costs around £15.00 per month.
  2. Dedicated FileMaker hosting: This is used for FileMaker Pro 15 which requires a dedicated server and costs £156.00 per month.

Advantages of using FileMaker

FileMaker allows one to create and deploy custom apps for all environments, mobiles and cloud to instantly solve the problems on the go. The benefits of using FileMaker are as follows:
  1. Cross-platform: This allows sharing of information among all the FileMaker users using Mac, iPhone, iPads, Windows and the web.
  2. iOS Ready: This creates powerful apps for iPads and iPhones which are ready on the go and completely utilizes all the features of the FileMaker. Also, these apps can be used to capture pictures and signatures, scan barcodes and many more.
  3. Data security: It keeps the data safe and sound by centralizing all the information on the FileMaker Server and providing authentications to access it. It allows managing user privileges individually.
  4. Cloud hosting: FileMaker cloud allows sharing of information with the team over the cloud which is reliable, safe and secure without the hassle of administrating all the processes.
  5. Easy integration: Using FileMaker, connections to the already existing databases such as SQL, ODBC/JDBC, XML or more can be made very easily. This allows a user to key an eye on all the processes and creates information views for all the business.
  6. Affordable rates: The FileMaker Platform is perfect and quite affordable for all the budgets and is comparatively inexpensive to large enterprises which are providing the same functions at higher rates.
  7. Built-in reporting tools: It offers the creation of reports on the spot. It provides a step-by-step assistant to easily create custom reports in a spreadsheet form of format with colorful charts and various styles.

Conclusion

It is by far the easiest custom application solution available since it allows young teenagers to build apps as per their requirements within no time and without knowing a bit about complex programming or coding.
If in case you are looking for a tutorial on how to create a custom mobile app without paying a penny for your websites or blogs then please read these tutorials:
Write A High-Quality Blog Post With These 6 Tips
Quality Blog Post Tips

Here are the steps of writing a blog post:
  1. You sit in front of your computer.
  2. You grab a topic from your editorial calendar.
  3. You start writing your blog post.
Is that all? NO!
  • It’s not about how many words you put into your new piece of content.
  • It’s not about how frequently you mentioned the focus keyword.
It’s the quality (and only the quality) of your blog post which matters.
You’re not writing articles to just fill up your blog with content. You’re not blogging for the sake of making money. You’re supposed to be writing for one reason:
  • To help your readers.
You need also to create something new while writing up your blog post.
Something that will make it rock and stand out among those other resources that are available elsewhere online.
For example, when I decided to write about ‘how to make money blogging’, I made sure to include successful iconic examples of other bloggers like Harsh Agrawal and how they managed to get this blogging thing working for them.
Not just that, but I also added myself into the comparison. I mentioned how much money I was making from blogging and what I was intending to do to level it up.
Writing up a blog post requires some sort of personalization.
It should let the reader believe that they can do the same thing (or even better) while at the same time inspiring them with amazing thoughts and ideas coming from the author’s personal experiences.
In this article, I will walk you through on how to write a quality blog post. I will be mentioning a few simple, easy-to-apply steps which will enhance your post quality and will help you level up your blog content.
#1 Make An Agenda
Make an Agenda
We just can’t pick a topic and write hundreds of pages on it without any agenda. We need to recognize how the content will be driving readers. Keep in mind the end goals which will make your content worthy of a reader’s gratitude.
It’s really important to set up and maintain an editorial calendar.
After you pick a topic, put in a few sub-points that you’re going to discuss in the article.
This way you will maintain a well-created outline with a clear target goal to reach your readers.
#2 Create A Brilliant Title
You need to stand out from the crowd by inventing brilliant titles.
Boring titles that only say what your blog post is about is not going to give you many readers.
Creating a great title is another essential process you need to spend time on. You need to make sure that your blog post is weaponed with an amazing, brilliant, and click-worthy title.
Regardless of how excellent your blog post is, most individuals can’t focus for more than 20 minutes.
  • Make sure your point is clear from the beginning.
The title here is the first connection between you and your reader. 
Make it as excellent as possible to draw your readers in like a magnet.
#3 Keep It Clean & Organized
In addition to a proper title, you also need well-formatted headings and an organized structure.
Unorganized information is completely fruitless.
While all of the information is important, writing it in an unorganized format will confuse your reader. A confused reader will leave your page immediately.
I usually prefer to write the first draft of my new blog post on Microsoft Word.
After completing it as a draft, I copy it over to the WordPress (my preferred blogging platform) Editor. I actually love using Microsoft Word at the draft writing stage.
Regardless of whether or not I have internet access, I can turn my thoughts into a new blog post with Microsoft Word.
You – as a blogger – should have Microsoft Word, or any other offline writing software, installed and configured on your laptop if you’re really serious about your blogging career. This way you can guarantee that you can start blogging wherever you are.
After finishing your first draft, it’s time to start cleaning and organizing to ensure that your post is good enough to be published.
Make sure to put in:
  • Headings
  • Bullet lists
  • Numbered lists
  • Multilevel lists
  • etc.
Remember, your #1 goal is to help your readers, so make sure you’re delivering your content in the best way possible.
#4 Write Down The Truth
Write down the truth
It’s a necessity to write down the truth.
You need to deliver the true message of whatever you’re blogging about.
As a reader, I can easily find information about what you’ve been blogging about via various other online resources.
What makes me read your blog is that I want to hear from you.
Make sure to respect your readers by delivering trustworthy content.
For example, if I’m writing a review post, I make sure to always try it out before delivering a review to my readers.
Let’s say I’m writing a blog post about how great banana juice is. I first prepare some banana juice and taste it to ensure I can be truthful in my review before dumping it on my blog for my readers.
Guaranteeing the truth within your blog posts is what will build your credibility and authority in your niche. Otherwise, people won’t trust what you’re saying and they will leave your website.
#5 Personalize Your Content
Let me ask you a question:
  • Why did you decide to start up a blog?
I’m sure there are many answers, but one of them is probably:
  • “To build up a personal brand”.
You need to personalize your content in order to build up your own personal brand. It’s straightforward, isn’t it?
You’re having great ideas and turning them into amazing blog posts. That’s really fabulous. But are you simply mentioning great points to your readers?
Or are you spending the time and going the extra mile to show them your personal experience with each of these points?
I stumbled upon a blog post a few days ago where the writer was mentioning “84 proven methods on how to make money via your blog”. I liked the idea of the blog post and I was very keen on reading it.
But after opening the post, I was disappointed to see that the author only mentioned those 84 methods and didn’t write anything else about them. He didn’t walk the extra mile for his readers and talk about his experience with these “proven” methods.
This is what readers and blog followers are looking for; personalized thoughts and ideas which they can apply themselves.
  • Make sure to personalize your blog posts.
Talk about yourself, your thoughts, and your personal experiences.
#6 On-Page SEO
On-Page-SEO
In the above-mentioned points, I made it clear on how should you speak to your readers:
  1. Prepare an agenda
  2. Create great titles
  3. Organize points
  4. Write trustworthy content
  5. Be personal
But how do you speak to search engines?
You still need to tell the web-index bots about your new blog post so it can be indexed and archived the right way. Search engines can be your first source of traffic if you maintain your posts well and keep them highly optimized.
On-page SEO includes various items:
  • URL slugs
  • Focus keywords
  • Post titles
  • Meta descriptions
  • Image alt tags
  • Headings
  • Inbound and outbound links
  • and more…
If you’re on a self-hosted WordPress blog, I highly recommend installing and configuring the Yoast SEO plug-in.
Yoast will tell you which things need to be corrected for better on-page SEO results.
Wrap Up:
There are different ways by which you can produce high-quality content on your blog.
The most important factor is to make sure you choose the right blogging niche.
  • You also need to be persistent and consistent.
Follow these 6 tips and watch as your blog grows in traffic, revenue, and authority.
Postcredits: shoutmeloud